Complete Step-by-Step Configuration Guide
GoldenGate 26ai brings native AI integration into the replication engine, enabling real-time enrichment directly within replication flows. With built-in support for embeddings, GoldenGate can generate vector representations inline during Replicat apply, eliminating the need for external pipelines or post-processing frameworks.
One of the simplest and most effective ways to get started was to integrate OpenAI as an external AI provider and use an embedding model to enrich replicated data in real time.
At the time this comprehensive step-by-step guide was written, GoldenGate supported multiple AI providers, including OpenAI, Gemini, OCI Generative AI, and Voyage AI.
This guide walks through the entire setup, end to end, including both configuration and validation:
- Creating and validating an OpenAI API key
- Registering OpenAI as an AI Provider in GoldenGate 26ai
- Registering an OpenAI embedding model (
text-embedding-3-small) - Validating end-to-end connectivity (network, authentication, and model access)
- Extending an existing Replicat to call the new AI Service (
@AISERVICE) - Storing embeddings in a native VECTOR column in the target Oracle table
- Verifying the results by querying the target table and viewing generated embeddings
Rather than introducing a brand-new replication pipeline, this walkthrough demonstrates how AI capabilities can be layered into an existing, already-working GoldenGate deployment with minimal changes.
The focus of this guide is embeddings only, which is the supported starting point for GoldenGate 26ai. All examples are intentionally simple and designed to highlight the mechanics of the AI Service, making it easy to expand into richer production use cases later.
Step 1 – Create an OpenAI API Key (Detailed)
GoldenGate 26ai authenticates to OpenAI using a Bearer API key. This key is required for every AI request, including embedding generation, and is passed securely as part of each outbound HTTPS call.
In this step, I will create an OpenAI API key using the OpenAI Platform, which serves as the foundation for all subsequent configuration steps.
Specifically, we will:
- Access the OpenAI Platform management console
- Generate a new API key dedicated to GoldenGate usage
- Securely store the key for later use in GoldenGate configuration
- Verify that the account is enabled for API usage
1.1 Open the OpenAI Platform
Open a browser and go to:
https://platform.openai.com
Log in using your OpenAI account credentials.
Important:
The ChatGPT UI and the OpenAI Platform are different.
API keys are managed only in platform.openai.com.
1.2 Navigate to the API Keys page
Once logged in:
- Click your settings (top-right)
- Select “API keys” from the left menu
Or go directly:
https://platform.openai.com/api-keys
1.3 Create a new API key
- Click Create new secret key
- Give it a descriptive name, for example:
- goldengate-26ai-embedding
- Click Create secret key
The generated key will look like:
sk-************************************
1.4 Copy and store the key securely
- Copy the key immediately
- This is the only time it will be displayed
Recommended storage:
- Encrypted password manager
Do not:
- Commit it to Git
- Store it in plaintext config files
- Share it over email or chat
GoldenGate will reference this key when calling OpenAI.
1.5 Verify billing and usage
Open:
https://platform.openai.com/account/billing
Make sure:
- Billing is enabled or
- You have active credits
This is the #1 cause of “mysterious” 401 / 429 errors.
1.6 Validate the key manually
From a machine with outbound internet access:
curl https://api.openai.com/v1/models \ -H "Authorization: Bearer YOUR_API_KEY" (Created on Step 1.3)
If you receive JSON output, the key and network path are valid.
Step 1 complete
You now have a valid OpenAI API key.
Step 2 – Add OpenAI as an AI Provider in GoldenGate 26ai
With the OpenAI API key created, the next step is to configure GoldenGate so it knows where to send AI requests and how to authenticate them.
In this step, I will register OpenAI as an AI Provider in GoldenGate 26ai. This establishes the outbound connection that Replicat will later use to generate embeddings.
Specifically, I will:
- Define the OpenAI API endpoint that GoldenGate will call
- Associate the provider with a secure API key
- Assign a provider identifier that can be referenced by AI models and Replicat mappings
2.1 Provider ID
This is an internal identifier used by GoldenGate.
Recommended value: openai
This value is referenced later when registering models.
2.2 Type
Select: OpenAI
2.3 Provider Name
This is a display name shown in the UI.
Use: OpenAI
2.4 Provider Base URL
Enter:
https://api.openai.com/v1
This is the base URL for all OpenAI API endpoints.
2.5 API Key
Paste the API key you created in Step 1.3, or reference it via your secure secret mechanism.
GoldenGate will automatically send it as: Authorization: Bearer <API_KEY>
2.5 Submit the Provider
Once saved:
- GoldenGate knows how to reach OpenAI
- No calls are made yet (that happens when a model is used)
Step 2 complete
OpenAI is now registered as an AI Provider.

Step 3 – Register an OpenAI Embedding Model
With OpenAI configured as an AI provider, the next step is to tell GoldenGate which specific AI model it should use when generating embeddings.
In this step, I will register an OpenAI embedding model with GoldenGate 26ai so it can be referenced by name during replication.
For this walkthrough, the model used is:
text-embedding-3-small
This model was chosen because it offers a strong balance between:
- Cost efficiency: suitable for continuous CDC workloads and my demo
- Throughput: intended to performs well under sustained replication rates, only small workloads were tested for this post
- Embedding quality: produces high-quality semantic vectors for search and analysis
3.1 Open “Add Model”,
In the AI Models section, click Add Model “Click on +“.
3.2 Fill in the model form
Use the following values.
3.2.1 Model ID
Enter: text-embedding-3-small
3.2.1 Description
Enter: OpenAI embedding model for GoldenGate 26ai vector-based features
3.2.2 Model Name
Enter: OpenAI Embedding v3 (Small)
3.2.3 Remote Model Name – CRITICAL
Enter: text-embedding-3-small
This value must exactly match the OpenAI model name.
3.2.4 Provider ID
Enter: openai
3.2.5 Capabilities
- Embedding
3.2.6 Enabled
- Yes
3.2.7 Maximum input characters
Enter: 20000
3.2.8 Save the model
If everything is correct:
- The model registers successfully
- No validation error is shown
3.2.9 Configure the OpenAI CA certificate for GoldenGate AI Service
When integrating Oracle GoldenGate 26ai with OpenAI embeddings, the AI Service runtime needed a trust the Certificate Authority (CA) that signs the OpenAI TLS certificates. Even if outbound HTTPS works with tools like curl, GoldenGate required to be explicitly configured.
In this practice, only the OpenAI root CA certificate was required.
1. Extract the OpenAI certificate chain
Run the following command from the same host or container where GoldenGate is running:
openssl s_client -showcerts -connect api.openai.com:443 </dev/null 2>/dev/null \| awk '/BEGIN CERTIFICATE/,/END CERTIFICATE/ {print}' > /tmp/openai_chain.pem
Verify the file contains multiple certificates:
grep -c "BEGIN CERTIFICATE" /tmp/openai_chain.pem
2. Split the certificate bundle into individual PEM files
GoldenGate expects one PEM object per certificate, so the bundle must be split:
cd /tmpcsplit -f cert_ -b "%03d.pem" openai_chain.pem '/-----BEGIN CERTIFICATE-----/' '{*}' >/dev/nullfind /tmp -maxdepth 1 -name "cert_*.pem" -size 0 -delete
3. Identify the certificates
Inspect each certificate to determine its role:
for f in /tmp/cert_*.pem; do echo "=== $f ===" openssl x509 -in "$f" -noout -subject -issuerdone
Typical output:
| File | Certificate Type |
|---|---|
cert_001.pem | Leaf certificate (CN=api.openai.com) |
cert_002.pem | Intermediate CA (Google Trust Services – WE1) |
cert_003.pem | Root CA (GTS Root R4) |
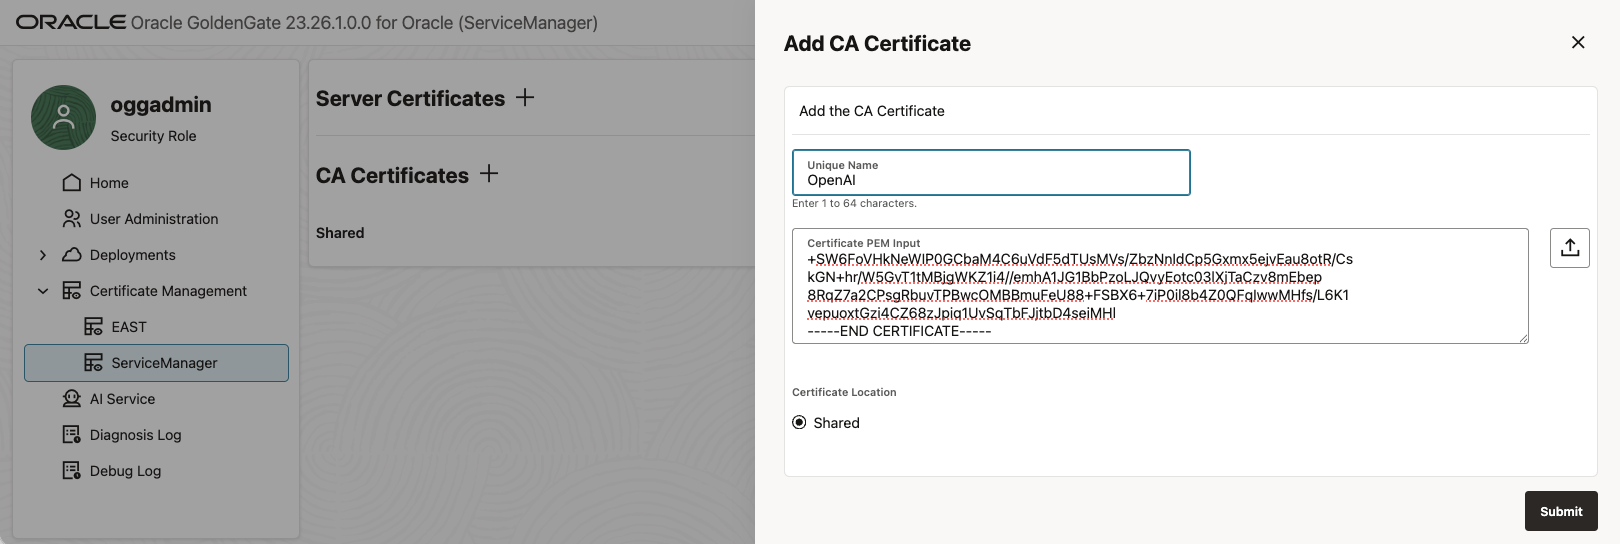
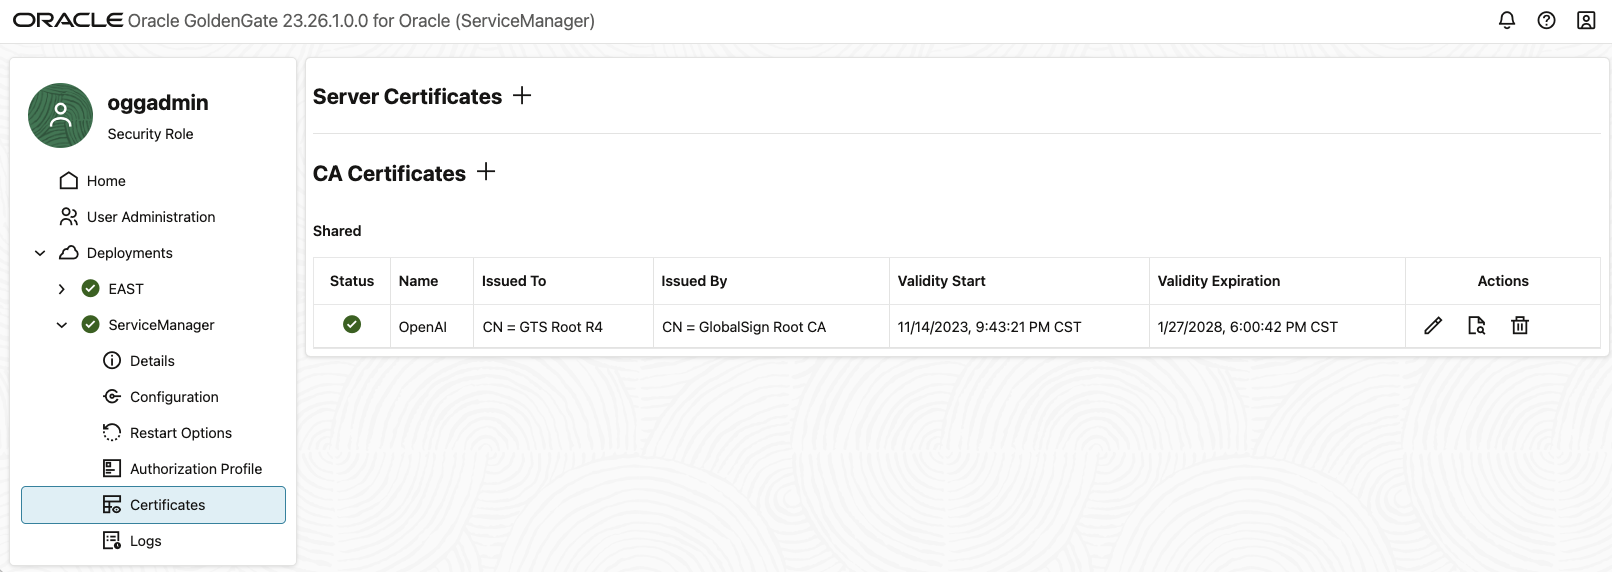
4. Upload only the Root CA certificate (recommended)
Based on testing, only the root CA certificate is required for this example:
$cat /tmp/cert_003.pemCopy from -----BEGIN CERTIFICATE----- to -----END CERTIFICATE-----
Upload this file in the GoldenGate Microservices UI:
⚠️ Important note on security and production deployments
The certificate configuration shown in this example is intentionally kept minimal and is provided for demonstration and development purposes only. This setup was validated in a local Docker-based GoldenGate environment running on my laptop, where simplicity and ease of iteration are key.
Production environments often have stricter security requirements, including corporate TLS inspection, custom trust chains, centralized certificate management, outbound proxy enforcement, and compliance policies that vary by organization. As a result, customers should not blindly replicate this configuration in production.
Before deploying Oracle GoldenGate AI Service in a production environment, customers should work closely with their security and networking teams to determine the most appropriate approach for certificate trust management. This may include:
- Integrating with enterprise-managed truststores
- Using organization approved Certificate Authorities
- Configuring outbound proxies and inspection devices
- Aligning with internal compliance and audit standards
The goal in this walkthrough is to demonstrate the end-to-end GoldenGate 26ai AI embedding workflow, not to prescribe a one-size-fits-all security configuration. Always tailor security settings to your organization’s policies and risk profile.
Step 3 complete
GoldenGate 26ai now has an embedding model available.


Step 4 – Validate End-to-End Connectivity
Before wiring the AI Service into Replicat, it’s important to validate that GoldenGate can successfully communicate with OpenAI end to end.
In this step, I will verify three critical things:
- Network connectivity
Confirm the GoldenGate host can reach the OpenAI API endpoint over HTTPS. - Authentication
Ensure the OpenAI API key is valid and correctly authorized. - Model access
Validate that the configured embedding model can successfully generate vectors.
This validation step isolates connectivity and credentials from GoldenGate configuration, making troubleshooting significantly easier. If anything fails here, it can be corrected before AI calls are introduced into the replication flow.
4.1 Test embedding creation (optional but recommended)
curl https://api.openai.com/v1/embeddings \ -H "Content-Type: application/json" \ -H "Authorization: Bearer YOUR_API_KEY" \ -d '{ "model": "text-embedding-3-small", "input": "GoldenGate 26ai embedding test" }'
Here is my test results:
curl https://api.openai.com/v1/embeddings \ -H "Content-Type: application/json" \ -H "Authorization: Bearer sk-proj-S_2E7WDiD_LucVgaOZ5BI.....f2HM-4PUVkA" \ -d '{ "model": "text-embedding-3-small", "input": "GoldenGate 26ai embedding test" }'{ "object": "list", "data": [ { "object": "embedding", "index": 0, "embedding": [ 0.015612928, -0.021232981, 0.06689967, -0.034982577, -0.011473022, -0.019519918, ...... ...... 0.012532418, -0.020962497, 0.0070964443, -0.0009851998, -0.0037153962 ] } ], "model": "text-embedding-3-small", "usage": { "prompt_tokens": 7, "total_tokens": 7 }}
If you receive a response containing an embedding array, everything is working.
Common errors and what they mean
401 Unauthorized
- Invalid or expired API key
- Billing not enabled
404 Not Found
- Typo in text-embedding-3-small
429 Too Many Requests
- Rate limit reached
- Free tier exhausted
- Too much parallelism
Step 5 – Add an Embedding Column to the Existing Target Table
In this demo, I already had end-to-end replication working for HR.EMPLOYEES. Rather than creating a new target table, I added one new column to the existing replicated table and then updated the existing Replicat mapping to populate it.
This approach keeps the demo focused on just the AI piece: adding embeddings inline during apply.
5.1 Alter the target table
On the target database, add a native VECTOR column sized for OpenAI text-embedding-3-small (1536 dimensions):
ALTER TABLE hr.employeesADD ( bio_embedding VECTOR(1536, FLOAT32) -- text-embedding-3-small (default));
Embedding Storage:
-- ===============================================================================-- EMBEDDING STORAGE - Choose ONE based on your provider:-- ===============================================================================-- OPENAI EMBEDDINGS-- bio_embedding VECTOR(1536, FLOAT32), -- text-embedding-3-small (default)-- bio_embedding VECTOR(3072, FLOAT32), -- text-embedding-3-large-- bio_embedding VECTOR(1536, FLOAT32), -- text-embedding-ada-002 (legacy)-- GOOGLE GEMINI EMBEDDINGS-- bio_embedding VECTOR(768, FLOAT32), -- text-embedding-004-- bio_embedding VECTOR(768, FLOAT32), -- textembedding-gecko-- bio_embedding VECTOR(768, FLOAT32), -- textembedding-gecko-multilingual-- OCI GENERATIVE AI (COHERE) EMBEDDINGS-- bio_embedding VECTOR(1024, FLOAT32), -- cohere.embed-english-v3.0-- bio_embedding VECTOR(1024, FLOAT32), -- cohere.embed-multilingual-v3.0-- bio_embedding VECTOR(384, FLOAT32), -- cohere.embed-english-light-v3.0-- bio_embedding VECTOR(384, FLOAT32), -- cohere.embed-multilingual-light-v3.0 (DEFAULT)-- VOYAGE AI EMBEDDINGS-- bio_embedding VECTOR(1024, FLOAT32), -- voyage-2-- bio_embedding VECTOR(1536, FLOAT32), -- voyage-large-2-- bio_embedding VECTOR(1536, FLOAT32), -- voyage-code-2-- bio_embedding VECTOR(1024, FLOAT32), -- voyage-lite-02-instruct-- ================================================================================
Why VECTOR?
Using a native VECTOR column is the right way to store embeddings in Oracle databases that support vectors. It avoids LOB/JSON overhead and enables direct similarity search and vector indexing later.
Quick Reference Table:
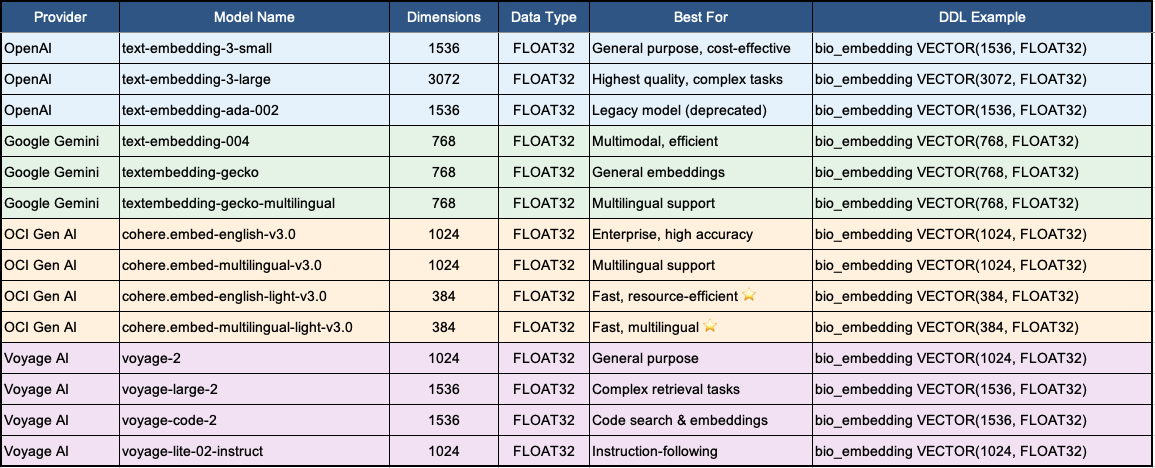
Step 6 – Update the Existing Replicat to Call AISERVICE
Now update your Replicat parameter file to call the new AI embedding service and store the resulting vector into BIO_EMBEDDING.
The @AISERVICE function enables inline AI processing directly within GoldenGate replication flows. It allows Replicat to invoke a configured AI model at apply time and use the result as part of the target mapping.
With @AISERVICE, AI enrichment becomes a native part of replication, eliminating the need for external pipelines, custom services, or post-processing steps.
@aiservice(embed, <model name>, <col>)
6.1 Replicat parameter file (updated)
REPLICAT RWESTUSERIDALIAS EAST DOMAIN OracleGoldenGateDDL INCLUDE MAPPEDMAP hr.employees, TARGET hr.employees,COLMAP ( USEDEFAULTS, bio_embedding = (embed,'text-embedding-3-small', first_name));--MAP hr.*, TARGET hr.*;
Demo intent:
For simplicity, this example generates an embedding from only theFIRST_NAMEcolumn. In real scenarios, you’d typically embed a richer text payload (e.g., name + title + department + location) to produce more meaningful vectors. In GoldenGate 23.26.1,@AISERVICEdoes not support expressions as its input argument, the function expects a single input column.
Step 7 – Run Replicat and Generate a Test Change
Once the Replicat is updated, restart it (or issue a parameter refresh depending on your operational practice):
STOP REPLICAT RWESTSTART REPLICAT RWEST
Now generate a change on the source:
UPDATE hr.employeesSET first_name = 'Alex'WHERE employee_id = 72047;COMMIT;
Any update that causes Replicat to apply the row will trigger the AISERVICE call and populate the embedding.
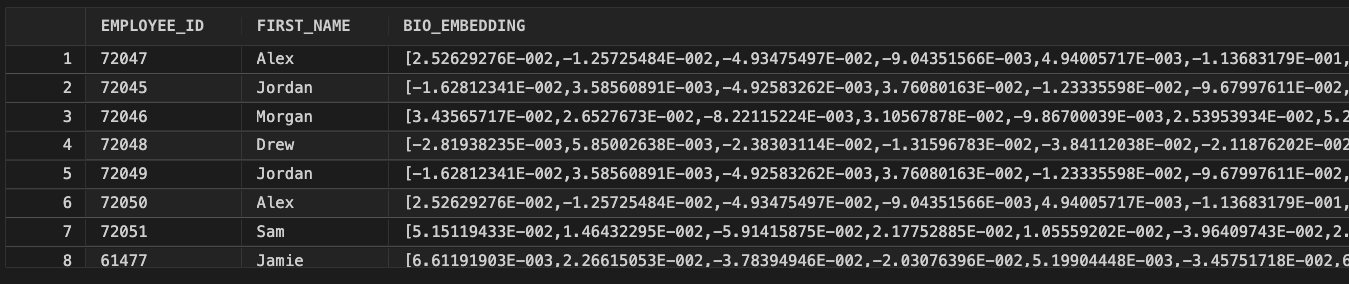
Step 8 – View the Table Output (Embeddings)
Finally, query the target table and show the embedding populated.
1) Quick verification (embedding exists)
SELECT employee_id, first_name, bio_embeddingFROM hr.employeesWHERE bio_embedding is not null;
Demo context
Demonstration note (laptop / PoC intent):
This configuration is intentionally simplified to demonstrate the concept of embedding generation inline in GoldenGate Replicat. In production environments, customers should work with their security and networking teams to define the right approach for API key management, outbound access controls, auditing, and model governance.
Conclusion
Putting this walkthrough together was a very hands-on exercise, and seeing it work end to end was genuinely rewarding. Starting from an existing GoldenGate replication flow, I was able to layer in AI capabilities with minimal changes and watch vector embeddings being generated inline during Replicat apply. There were no new pipelines to manage and no post processing steps AI simply became part of the data movement itself.
While this example was built in a local Docker environment for demonstration purposes, the same concepts apply to enterprise deployments when aligned with the appropriate security and governance practices. This is just the first step in GoldenGate’s AI journey, but it’s already a meaningful one turning real-time data replication into real time data enrichment, directly inside GoldenGate.

Leave a comment